
MR & MRS : diy & playtime
This post hopefully follows on nicely from last week's 'pimping the place' theme, as I plan to share more about the fun DIY projects and other creative super heroes we worked with.
I'll try to break it up into fun, photo-filled and manageable chunks but can't promise I won't get carried away with waffling about the amazing people who helped us with certain things because... well, they're ALL AMAZING and deserve to be shouted about!
stationery
It's no big secret that we love the outdoors, and together I think we make the perfect adventure buddies so the idea of journeys, exploring, the outdoors and adventuring in general worked it's way into our wedding from the beginning.
Referring to the wedding and all the planning as our next adventure kind of came naturally as we started discussing everything soon after we got engaged. I mean, we're always planning our next adventure with the tent so it seemed fitting that this would be our next BIGGEST ADVENTURE.

Starting to plan our next adventure! Eeek! with the @rocknrollbride x @veronicadearly planner
With that in mind, and with a little persuasion, The Beard agreed to let me use the phrase and create a hashtag to start the theme and design ideas for our stationery. It's a bit long winded but the wedding came to be known as 'Jo and Will's next adventure' and looking back I'm so happy I did the cheesy, very millennial thing of creating #joandwillsnextadventure on Instagram because it's now full of happy, colourful memories to look back on.
After months of whittling, scribbling, screwing paper up and whittling some more, I finally came up with some ideas for the stationery we needed. It was only Save the Date cards and the actual invites but my god is designing for your own personal use stressful, so it felt like it took me forever! Thankfully, Will liked most of the initial ideas and whilst my design/drawing style is very much linked to my business (funny that!) we tried to create something a bit more US, rather than just Hello Sunshine-esque.

Hello Sunshine pins, inspired by our adventures, went on to inspire our wedding stationery!
save the dates
My graphic design and typography skills are a bit.. well.. pants! I know what I like and can form quite clear ideas in my mind but when it comes to executing them nicely, I fall apart. That's where the magical, wonderfully talented human bean that is Cat, of Twin Pines Creative came in to save the date - literally! Cat is not only one of my besties but is also responsible for my Hello Sunshine branding so I knew if anyone could help me it was her! With my initial mock ups and Cat's eye for typography and composition, our simple Save the Date designs came to life.

That @twinpines_ is a clever sausage don't you know, she helped pimp my idea so it looked super smart and @poppressuk are stationery-making geniuseseses 💛
After admiring the beautiful work of Pop Press, (a Nottingham based Letterpress studio ran by Ming and Steve, for a long time) I knew they would be the perfect people to help us make our Save the Dates special. And they truly did, the gorgeous extra thick stock paper with the bold and bright, perfectly printed type looked (and felt!) AMAZING! Snuggled in their sunshine yellow envelopes, I almost didn't want to send them out, they were so beautiful! I don't think Pegs wanted to see them go either...

Pegs made sure we sealed the envelopes properly!
invites
For the actual invitations we figured out that we needed a few different elements, only three in the end but sadly we didn't have the budget to get them all letter-pressed - as much as I REALLY wanted to. Following the same simple style and complimenting the yellow with our #anoraktwats coat colours, we decided on a fun, illustrative set of info cards.

As with the Save the Date cards, I called upon Cat to help give my mock-up designs a once over and before we knew it the months of stress and worrying had been worth it and we had a set of three fun postcards ready to get printed! YAY! Thanks to printed.com and allcolourenvelopes.co.uk they came to life beautifully and we were in love with the final colours. As far as I'm aware, they all went down well with the guests and everyone who could make it turned up in the right place, on the right day so I think they worked a treat!

seating plans & order of service... or not
I mentioned briefly in the foodie update a couple of posts back, we decided against a seating plan but we also decided not to produce orders of service. This worked out brilliantly for two reasons... one it saved us cash monies on stationery and two, the day itself ran a little differently than we planned due to the weather - more on sliding cheese towers and the day itself in the next post though.

The seating plan... 📷 Daniel Ackerley Photography
Instead we decided to paint up a couple of old wooden palettes to display on the day. Will managed to pick up a couple for free from his workplace (BONUS!) and all I needed to do was decide on what to write and paint them. I think they worked pretty well in the end too... not bad for freebies, eh?

The order of service... 📷 Daniel Ackerley Photography
favours
Quite early on, we had decided that enamel pin badges would be the perfect thing to have as our favours, it's a popular option these days too. Something fun, something guests could use/wear and also something I knew would be pretty easy to make with existing contacts and my experience in the pin game.
As soon as we'd set the date and decided to book Colin the Campervan for our Mini-moon, we instantly had a subject for our favour pins! I was in love with how they turned out in the end, I think Colin was pretty chuffed when he finally saw one too...

Guess the secret is out about where the other half of the inspiration for the Happy Camper pin came from now 💛
The Beard helped me finalise a simple design to go onto backing cards and stickers, then after speaking to lovely Kate who makes beautiful paper goods for her esty shop, Artefacts, we also had the perfect little gift envelopes to package these happy campers in.

Happy little campers ready for their gift bags and stickers!
On the day, my beautiful old Raleigh Bike, called Pi, played a very important role in displaying our little favour packages in her Sunflower adorned basket. I had also painted some old clip boards to use as signs for various things throughout the wedding, so we popped one of these in with the favours so our guests knew to help themselves. I think Pi looked very cute and it made my heart so happy to see so many of our guests wandering around throughout the day wearing the little pins we had created.

thank you table
guest book
I had A LOT of fun planning and making, basically, a giant scrap book to leave on a table for our guests to play with. I had bought a big square scrapbook from Hobbycraft, which I thought would make a perfect scribble pad but as someone who finds blank pages VERY intimidating I decided to have a play with breaking them up and making them a bit more 'friendly!'

Coming up with silly & fun quotes to go inside our guest book.
Using thin black washi tape, some more of the fun polaroids from Cheerz and my trusty dymo label maker, I broke up each page with photos, silly quotes and washi tape grids. After doodling one of my favourite Winnie the Pooh quotes on the frontcover (thank you Pinterest!) we had our finished guestbook!

One of my favourite quotes from my favourite bear 🐻
mailbox
As well as the guestbook, we also decided to make this table home to an old style US mailbox for guests to pop any cards in. I had fallen in love with Cat and Darren's UP! themed mailbox at their wedding a few years previous and wanted something similar (sorry Cat!) After scouring eBay and Amazon, we found a plain white one and used colourful magnetic letters to spell out what it was for.

Toby Cat helping to check my spelling... he's a good boy!
finishing touches
As I'd been planning this table of loveliness in my mind, I knew it would need a little something extra to help us say THANK YOU to our guests as they came to leave messages, take favours and gift any cards. A couple of years ago I had the absolute pleasure of meeting, chatting to and doodling the VERY lovely Esther at Handmade Nottingham Markets. Esther owns Petrichoralia and makes the most BEAUTIFUL concrete jewellery and homeware so I crossed all my bits when I asked her if she could make some concrete letters for our Big Day!

Happy dancing to parcels of joy from Esther @Petrichoralia
Thankfully she said YES and I did a little happy dance. I did an even bigger happy dance when the postman delivered the beautiful painted THANK YOU and JO & WILL letters she had made for us. They looked so beautiful on the day and finished off our little corner of thank yous perfectly!

BIG DIYs
This next section of waffle is dedicated to my AMAZING parents, Janet and Tony. Also known as Gadget & Tool, G&T and The Workbench Shop. Not only did my parents help with moral and financial support for our big day (the dress in particular!) but with their combined problem solving and hands on skills they helped us bring to life so many little DIY projects and ONE HUGE one for our wedding.
After filling multiple boards on magical Pinterest, we had a good idea of what we might be able to tackle ourselves in terms of DIY projects. So I ran off to my folks with a sketchbook full of scribbles to see if The Workbench Shop could help us. What follows is a list of exactly what I wished for and exactly what they could do - EVERYTHING! Like I said, they are AMAZING!
SHOWING THE WAY
welcome sign
We wanted to pop something outside the front of the village hall to let people know where to find us. After drawing up and requesting a simple A-board, Dad whipped up this MDF beaut and I all I had to do was remember how to spell our names and keep a steady whilst hand painting it.

Always helping...
Oh and for the finishing touch, I also had to fight Toby Cat for the pom-poms I had made so we could add a colourful, fluffy trim! The colours looked so bright and fun together and whne the board was sat outside on the green grass, I think it looked beautiful.

Sunny, colourful sign snap captured by @apriltowriess
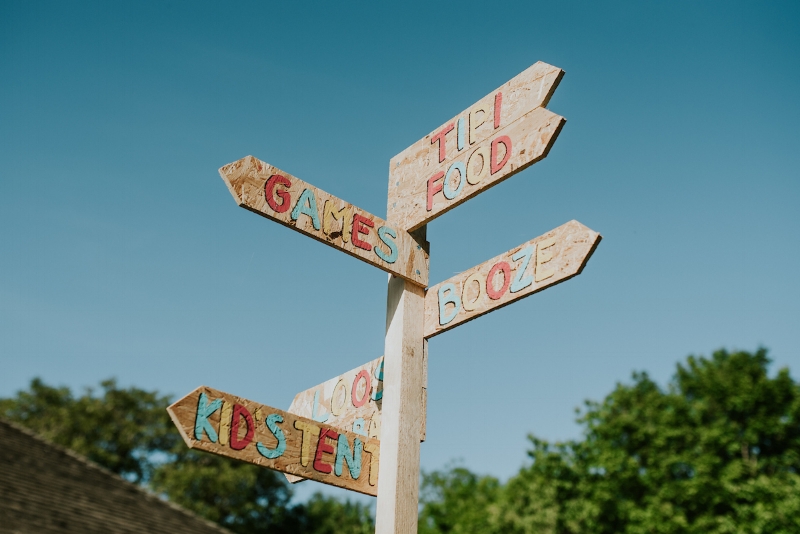
signpost
Another Pinterest find that I dreamt about making a reality was a fun, festival style signpost, one made of OSB and painted in fun colours to show guests where to go for food, drinks, the loos etc. OK, so it's not like anyone was going to get lost at Horningsea Pavilion but it looked fun and I wanted to give it a bash.

Well... it’s a big part of the adventure 🙊
As if by magic, and in no time at all Mr Workbench Shop (my Dad) whipped up several OSB arrows and a simple, sturdy stand and pole for us to screw them too. Honestly, I didn't stop smiling as I was painting all the signs (apart from when I fudged one up and swore quite a lot!) and I think it looked bloody brilliant against the blue skies on the day of the wedding!
games
To make use of the space we had on the village green and make sure we had some fun things for our guests to do, Will and I had decided to try and create some lawn games. We batted around (pun actually not intended but I'm leaving in it!) the idea of giant chess, naughts and crosses, a coconut shy, hula hoops, bubble wands, a kids colouring in tent, Mölkky and beer pong - we had LOADS of ideas and wanted to do them ALL!
Luckily, with the help of Team Workbench Shop we were able to do EVERYTHING except giant chess - those sets are EXPENSIVE and although I'm sure Dad would have been up for the challenge, asking him to make a full giant chess set on top of everything else might have been a bit much.
Mölkky
Mölkky is a Finnish throwing game, where the players use a wooden pin (a "mölkky") to try to knock over wooden pins ("skittles"), which are marked with numbers from 1 to 12. The first one to reach exactly 50 points wins the game.

Will and I had played this game a couple of times with friends one Summer, and although I was rubbish we both loved it and thought it would be a fun game to have at the wedding. Initially we thought we might buy a set but after chatting with my folks, Dad casually said, “I can knock that up for you” and he bloody well did - it looked WAY better than any of the sets we had seen too!

Have you played Mölkky before?
giant naughts and crosses
Another classic game, which we thought might be fun on a large scale was naughts and crosses. Dad got to work making us some giant Os and equally giant Xs, whilst Will got his trusty Ashley Book of Knots out and got to work with some rope Dad had sourced from Beeston Marina to create a giant grid. Once the boys had worked their magic, I got my paints out and enjoyed a sunny day (and several brews) in the garden painting them up.

Enjoying a sunny day of DIY and brews back in April ☀️
I don't actually have any photos of the set being used on the day, but I have it on good authority (mainly from the cats) that it looked great and made for a good game!

Good game, good game!
coconut shy
At first I wasn't sure if I was being a bit daft with dreams of having a full blown coconut shy at the wedding, but the more I thought about it and after my folks said it would be something they could help with I started to get a bit excited! Dad worked his magic (again) with some broom handles, screws and (after experimenting with everything from tennis balls to tin cans), some plastic balls cut in half to hold the coconuts. They worked perfectly and after adding some coloured washi tape to brighten the poles, we had our very own, homemade coconut shy!

Finishing touches... the coconuts!
On the day, the poles were staked firmly in to the ground, inside a simple gazebo (to catch rogue balls and coconuts!) and it was adorned with bunting and fairy lights before the coconuts were popped in to position. Judging by the smashed up coconut aftermath the following morning, I think it went down quite well on the day.

the biggest diy... ever
the sunshine van of dreams
It's no big secret that I've always wanted to own my own Campervan, a Sunshine yellow split screen would be THE dream, but realistically I'll take any I can pootle around and go on adventures in. Will has always wanted to own one too and before I met him had also hired and travelled around in them - one day we may have our own!
So when I made a throwaway comment about having a giant cardboard cut out van at the wedding, it was an idea neither of us actually wanted to throw away. Although we weren't about to spend our evenings cutting up cardboard, we were both willing to look into making a life size, wooden one that we could use as a photo booth. Go big or go home, right?
I ran this idea past my DIY hero, yup, you guessed it, Mr Workbench Shop and when he didn’t laugh in my face and said it was something they could help with I started to get a bit giddy. I spent a lot of time researching materials, looking up measurements of actual split screen campers and thinking about how we could make this happen. After some scribbling, a couple of trips to B&Q and a date in the diary for team Workbench Shop to visit, we were ready to make this happen!

Team Workbenchshop on the job - let the cutting commence!
Will helped me grid up and scale my drawing and we transferred the design over two huge MDF boards. Dad brought all is tools to get cutting and after Mum and I did countless tea runs and supervised, we had two halves of our dream van ready to paint!

Painting the dream to life!
After priming and painting the wood, which took me a couple of days as well as getting in a mess (myself and the patio… sorry Will!), the Sunshine Splitty was starting to come to life! There were two bits missing though, two things I didn’t want to hand paint so I spoke to my go-to-laser-guru, Laura at Bespoke Laser UK. Laura always helps me with my crazy ideas, she puts up with so many random emails from me and this time was no different - she helped us put the perfect, finishing touches to the van with a printed number plate and laser cut custom logo.

"If you can dodge a wench..."
When the ‘JW’ logo and ‘L for Love’ number plate arrived, we were beside ourselves and couldn’t wait to put it all together. After an evening of scribbling, maths and measuring, Will had worked out how to build a frame to make our Photo Booth sturdy and enable guests to walk behind it and take lots of lovely photos.

In the garden, building a van... as you do!
The following evening we gathered all the materials and headed into the garden to build the van. It went up perfectly, and also came down easily so we could transport it to the venue the day before the wedding.

BEEP BEEP! Next stop... wedding!
Needless to say we were both incredibly proud of what we had made and we could not have done it without the help of team Workbenchshop and Bespoke Laser UK. It looked brilliant and with colourful paper ribbons behind it on the day, it provided a fun corner in the hall for guests to take snaps and enjoy.
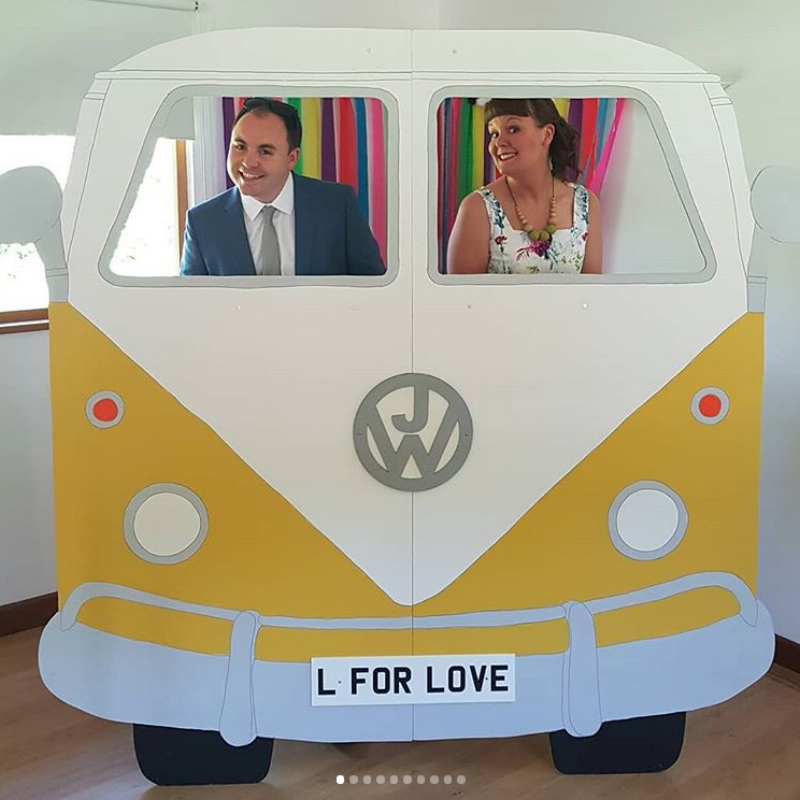
The lovely @apriltowriess and Sean looking fabulous in the Sunshine van!
Phew! This post turned out to be a long one, didn’t it? But I hope you’ll agree that it was a juicy one, full of fun stuff and amazing people who helped us make some bloody incredible things for our wedding.
A HUGE thank you to everyone who I’ve already mentioned above and to lovely April (Kook Events) who totally got on board with all of our daft DIY ideas and helped us set everything up (and down!) over the weekend. We are eternally grateful to each and every one of you.
Find out more about them all via the links below, go show them some love and if you’re itching for a little bit more wedding waffle, pop back next week for a final round up of the day itself and a chance to leave any questions or requests - I’m thinking of following that up with a mini Q&A and possibly some bloopers if you’re all up for that kind of thing?!
TWIN PINES CREATIVE
design guru | twinpinescreative.com | @twinpines_
POP PRESS
save the dates | pop-press.co.uk | @poppressuk
ARTEFACTS
paper envelopes | etsy.com/artefacts
PETRICHORALIA
concrete letters | etsy.com/Petrichoralia | @petrichoralia
CHEERZ
polaroid snaps | cheerz.com | @cheerz
WORKBENCH SHOP
diy gurus | etsy.com/workbenchshop | @workbenchshop
BESPOKE LASER UK
laser heroes | bespokelaseruk.co.uk | @bespokelaseruk
KOOK EVENTS
coordinator | kookevents.co.uk | @kookevents
DANIEL ACKERLEY
photography | peterboroughweddingphotography.co.uk | @danielackerley
next up : the BIG day
A run down of what we got up to in the morning (hello hash browns and paddle boarding!), how the day ended up running and a little bit about the morning after...